

By Ehtijad Ali
Updated: September 2026
Reading time: about 12 minutes
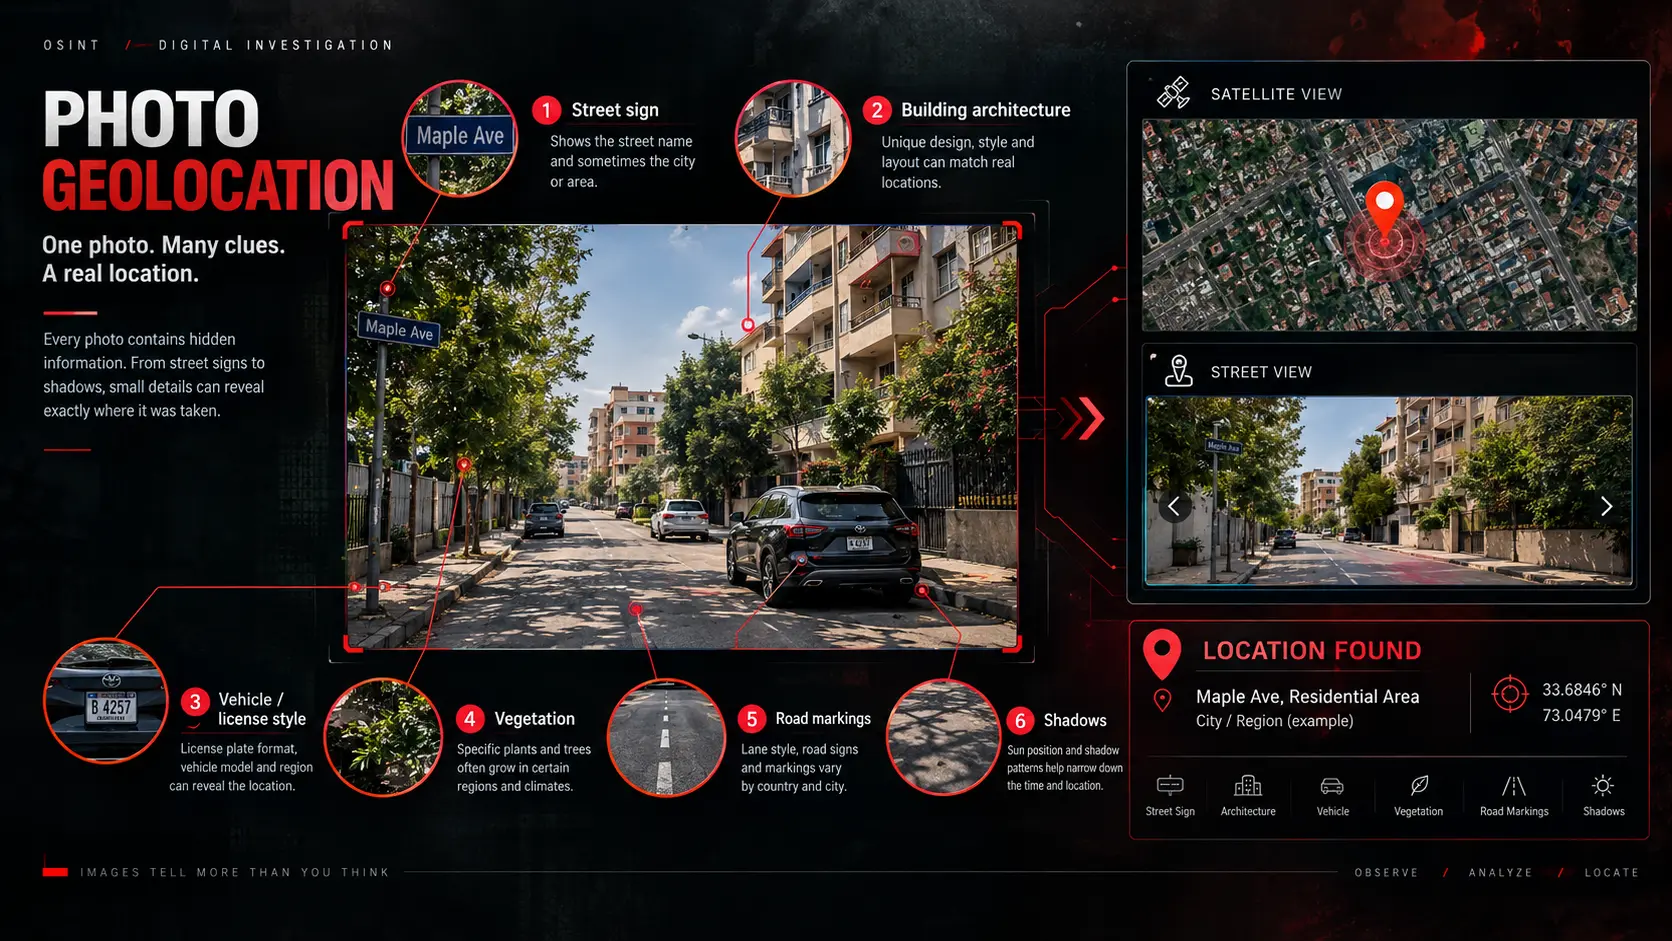
Somebody sends you a photo. No caption. No location. Just a street.
Can you work out where it was taken? Very often, yes.
Investigators do this every day. They do not use magic software. They read small details, one at a time, and check each one.
Anyone can learn how to find where a photo was taken. It is patience, not talent.
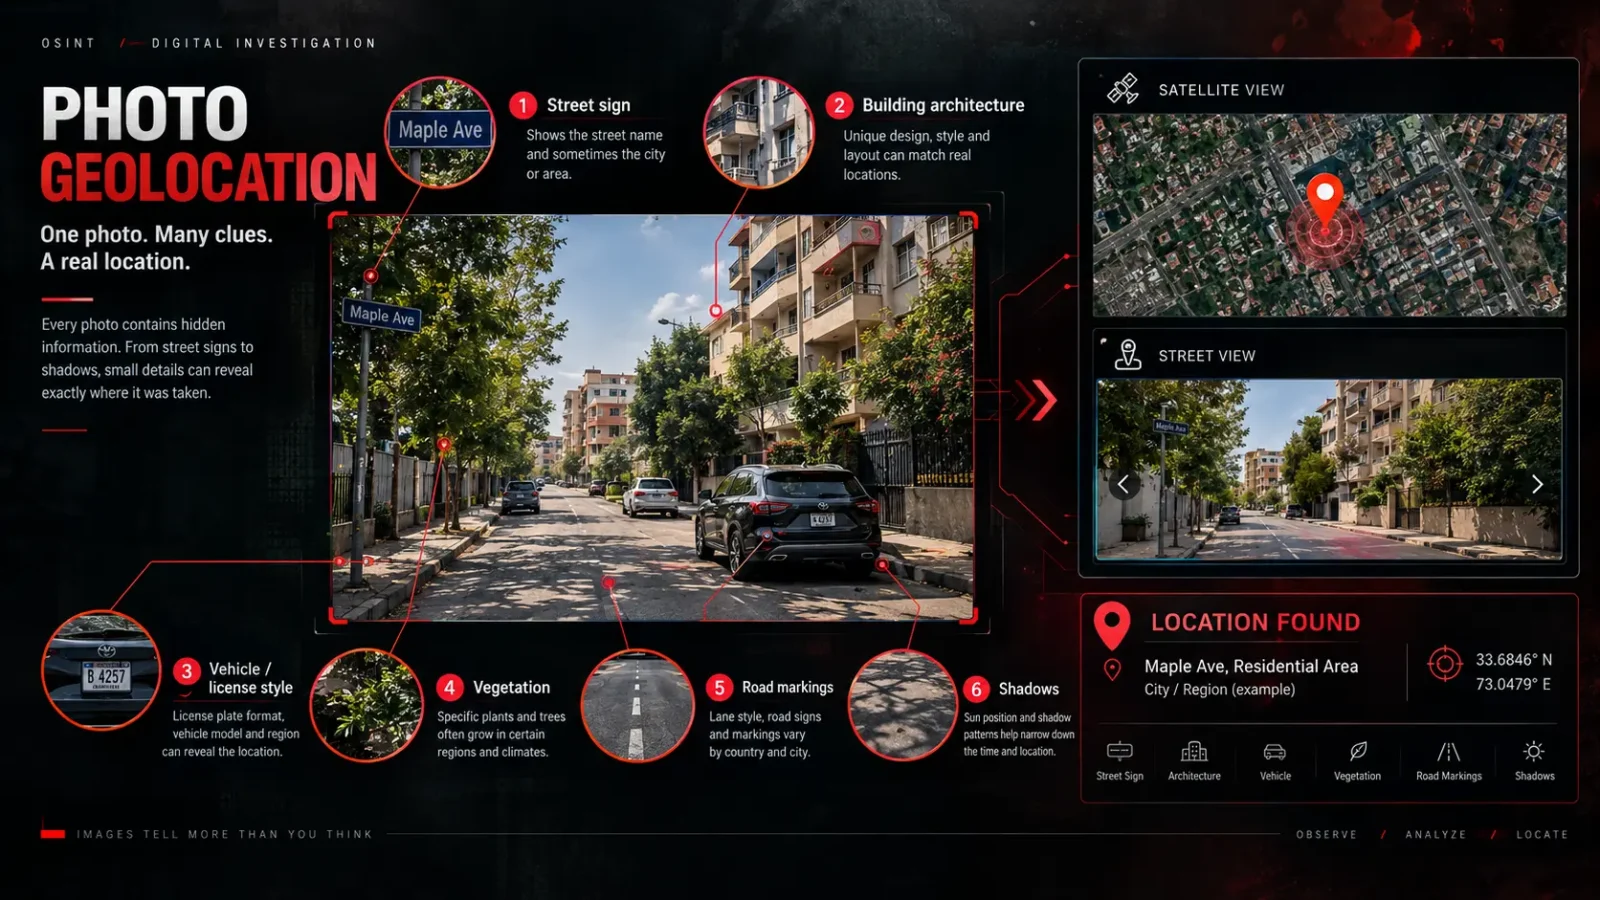
This guide shows how to find where a photo was taken, in plain words. Seven clues, in the order the professionals use them.
The methods here are the same ones taught by open-source researchers such as Bellingcat. Nothing secret. Nothing illegal.
What is in this guide?
How to find where a photo was taken, in one minute
If you only have a minute, here it is.
- Open the original file and check the metadata. It may hold GPS coordinates.
- Read every sign, word and number you can see.
- Study the buildings, roads and cars. They say which country you are in.
- Look at the plants and the land. They say which climate you are in.
- Measure the shadows. They give you a direction and a time.
- Run a reverse image search.
- Match the scene against satellite maps and Street View.
That is the whole method. Now let us do each step slowly.
Each clue on its own is weak. Together they are strong.
What you need before you start
Good news. How to find where a photo was taken costs nothing to learn.
You do not need paid software or special access. You need four free things.
- The original file, not a screenshot, whenever you can get it.
- A map with satellite view, so you can look straight down at roofs and roads.
- Street View, or any ground-level photo service for that country.
- A reverse image search, to see if the picture is already online somewhere.
A notebook helps more than you would think. Write down each clue and what it rules out.
Keep one habit above all. Write your confidence next to every clue: sure, likely, or guess.
People who are good at how to find where a photo was taken are not better guessers. They are just honest about which parts are guesses.
One last thing before the clues. Work in order. Skipping to the map first is the most common way to waste an afternoon.
The full process, from photo to place
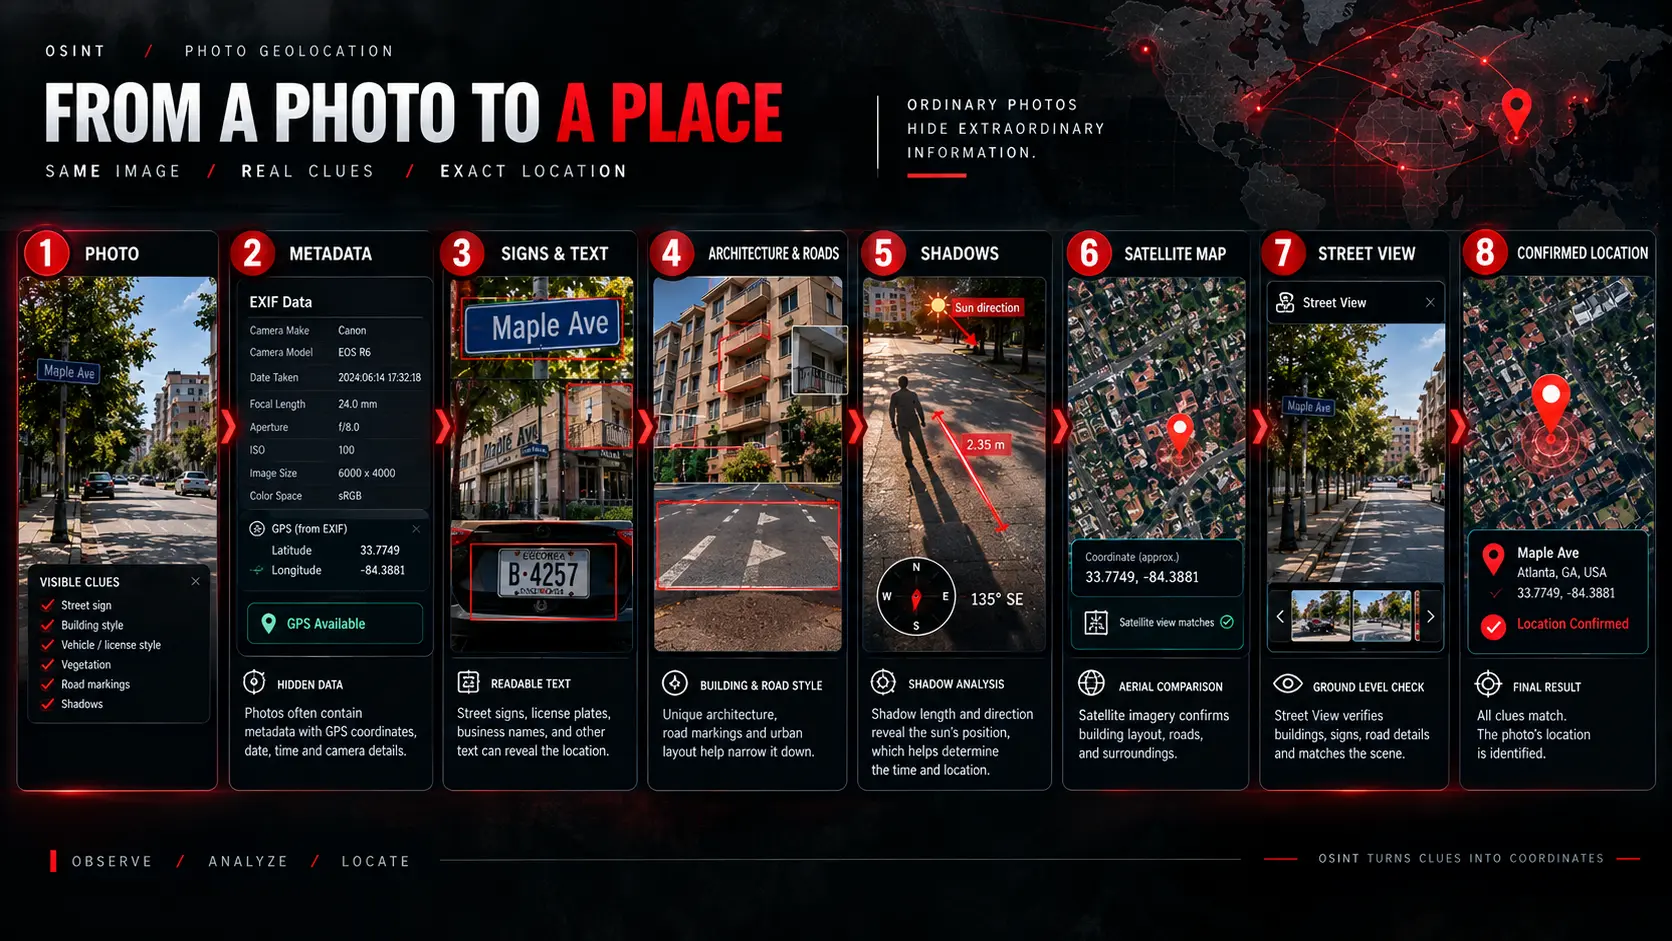
Notice the shape of it. You are not looking for one magic clue.
You are shrinking the map. First the world. Then a country. Then a city. Then one street corner.
That is the real answer to how to find where a photo was taken. Narrow, check, narrow again.
Clue 1: Check the photo’s metadata first
Always start here. It takes ten seconds and it sometimes ends the job.
Everyone learning how to find where a photo was taken should begin with the file, not the picture.
Most cameras and phones save hidden notes inside the picture file. This is called EXIF data.
EXIF can include:
- The camera make and model
- The exact date and time
- Camera settings like aperture and ISO
- GPS coordinates, if location was switched on
If GPS is there, you are done. Paste the numbers into a map and look.
To read EXIF, use a free tool like ExifTool, or right-click the file and open its properties.
One warning. Most social media sites strip this data when you upload. A photo saved from Instagram or X usually has nothing left.
So always ask for the original file if you can. That is the first rule of how to find where a photo was taken.
Clue 2: Read every sign and word
Text is the fastest shortcut on the list. Zoom in and read everything.
When there is writing in the frame, how to find where a photo was taken becomes a reading exercise.
- Street signs. A street name plus a guess at the city is often enough.
- Shop names. Search the name and see which town it sits in.
- Number plates. Their shape and colour change from country to country.
- Posters and adverts. A local phone number gives you an area code.
- The language and alphabet. Even blurry text narrows the world down fast.
Do not stop at the big signs. A tiny sticker on a lamp post can name a local company.
Clue 3: Study the buildings, roads and cars
When there is no text, the built world still talks.
This is how to find where a photo was taken in a place with no signs at all.
Buildings
Look at roof shape, balcony style, window frames and building material. A flat roof with water tanks says one part of the world. A steep roof with snow guards says another.
Roads
Which side do the cars drive on? What colour are the lane markings? Are the kerbs painted? Road paint is surprisingly national.
Vehicles
Car models are sold in different places. Taxi colours, bus liveries and delivery vans are even better, because they are often city-specific.
Street furniture counts too. Bollards, post boxes, traffic lights, power poles and manhole covers all vary by country.
Clue 4: Look at the plants and the land
Nature is a climate map you can read for free.
Plants will not give you a street. They will cross off half the planet.
- Palm trees mean warm. Birch and pine mean cool.
- Dry yellow grass and green grass point to different seasons.
- Mountains, hills or flat land on the skyline narrow the region.
- Bare branches or full leaves tell you roughly which season it is.
Season matters more than people expect. It helps you decide which satellite image to compare against later.
Clue 5: Use shadows to find the time and direction
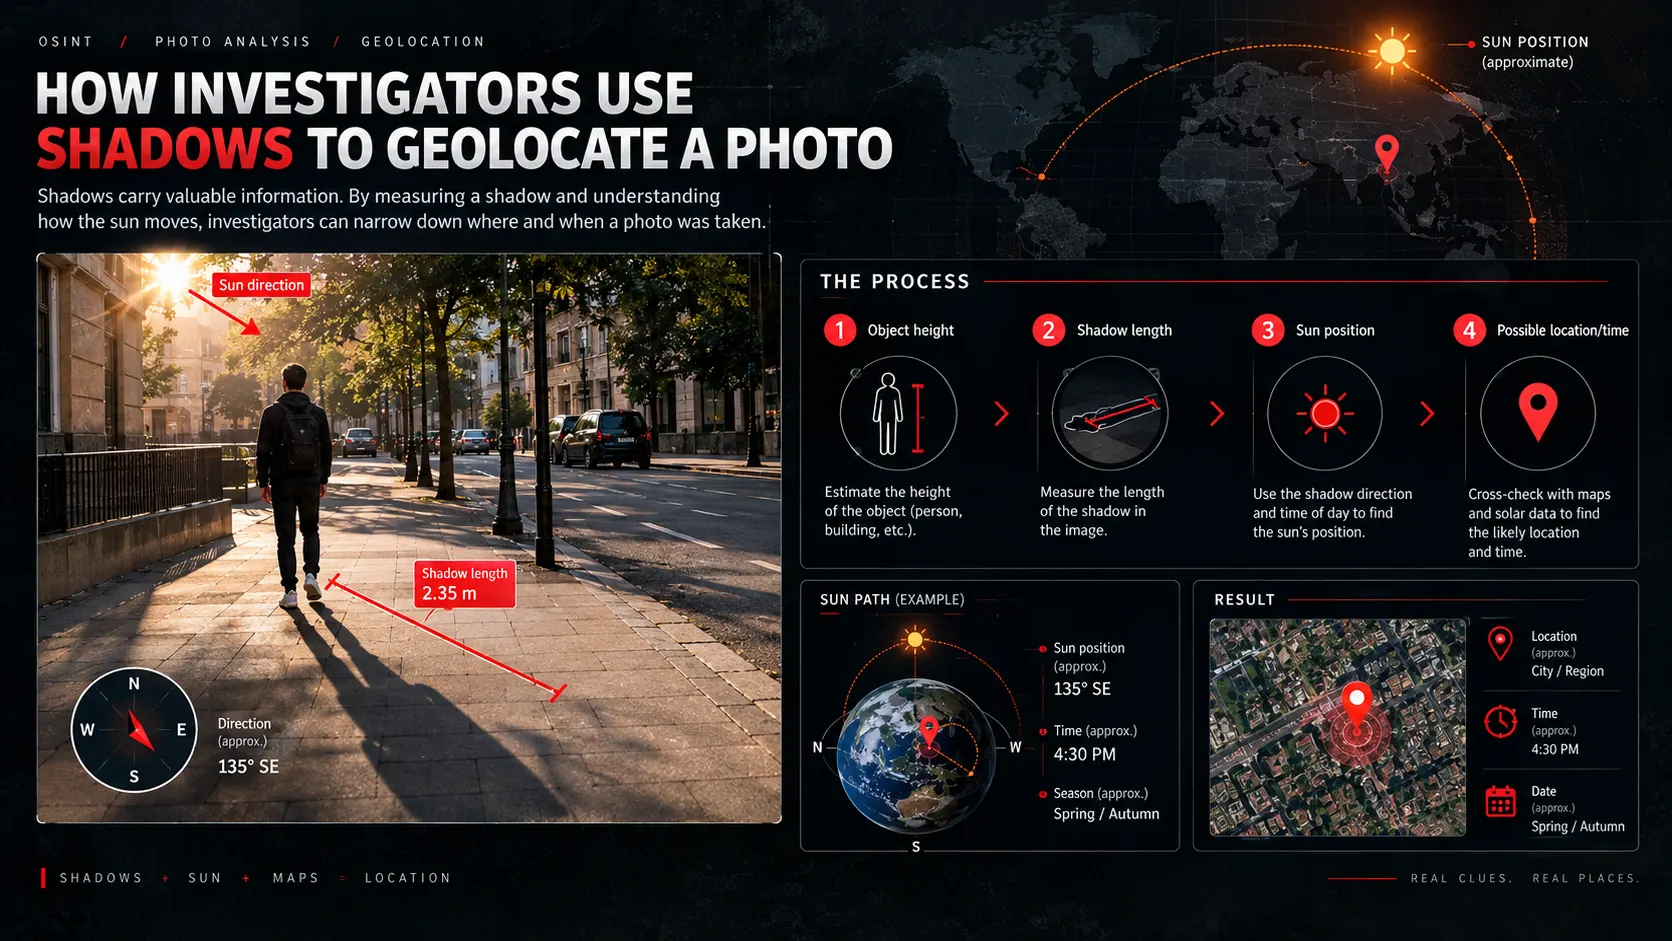
This is the part that feels like a trick, but it is simple.
The sun moves in a known path. So a shadow tells you two things at once. To work out when a photo was taken, not just where, see our guide to chronolocation.
- Direction. Which way the shadow points tells you where the sun was.
- Time. How long the shadow is tells you how high the sun was.
Pick something whose height you can guess, like a person or a lamp post. Compare the object to its shadow.
A short shadow means the sun is high, so it is near midday. A long shadow means early morning or late afternoon.
Then feed your guess into a solar tool such as the NOAA Solar Calculator. It shows where the sun sat at a given place, date and time.
Shadows rarely give you an address on their own. They are brilliant at proving a guess wrong, which is just as useful.
Half of how to find where a photo was taken is deleting wrong answers.
That is a big part of how to find where a photo was taken: cutting away the places it cannot be.
Clue 6: Run a reverse image search
Now let a machine do some work. Upload the photo and ask the internet if it has seen it before.
This step is the shortcut in how to find where a photo was taken, when it works at all.
- Google Lens is strong on landmarks and products.
- Yandex Images is often the best for buildings and street scenes.
- TinEye finds where a picture was published before.
Try cropping first. Search just the building, or just the sign, instead of the whole picture.
Careful here. A “similar” result is not a match. Two apartment blocks can look like twins and sit a thousand miles apart.
Clue 7: Match it against maps and satellite images
By now you should have a small area to search. This is where you prove it.
Every serious answer to how to find where a photo was taken ends on a map.
Switch to satellite view and look down at the shape of things:
- The outline of the building and its roof
- How the road bends, and where junctions sit
- The pattern of trees along the street
- Car parks, courtyards and open ground
Use the shadow direction you worked out. It tells you which way the camera was facing, so you know where to stand on the map.
Then open Street View at that spot and compare. Match at least three fixed things: a building corner, a sign, a tree, a kerb line.
Three solid matches is the standard investigators use. One match is a coincidence.
Meet that standard and you can say you know how to find where a photo was taken, and prove it.
A worked example, start to finish
Here is how to find where a photo was taken when you have almost nothing to go on.
Say you get a street photo. No caption. No file, just a screenshot.
- Metadata: none. It is a screenshot, so that door is shut.
- Text: a blue street sign reading “Maple Ave” in English.
- Cars: driving on the right, wide vehicles, yellow centre line. That says North America.
- Plants: full green leaves and no snow. So spring or summer.
- Shadows: pointing south-east and fairly long. Late afternoon.
- Reverse search: the apartment block returns a listing in one city.
- Satellite: search “Maple Ave” in that city, find a street lined with the same trees.
- Street View: the balconies, the sign and the kerb all line up. Confirmed.
Eight small steps. Not one clever trick.
That is how to find where a photo was taken in the real world: slow, boring and reliable.
Five mistakes that ruin the answer
Most wrong answers come from the same handful of errors.
They are worth knowing, because each one quietly breaks how to find where a photo was taken.
Mistake 1: trusting a single clue
One sign can be moved. One car can be imported. Build your case from several clues that agree.
Mistake 2: trusting AI without checking
An AI tool may name a city with great confidence and be completely wrong. Treat its answer as a guess to test, never as proof.
Mistake 3: working from a screenshot
A screenshot throws away the metadata and softens the detail. Ask for the original file every time.
Mistake 4: stopping at “looks similar”
Similar is not the same. Keep going until several fixed features line up exactly.
Mistake 5: forgetting that places change
Street View may be four years old. Shops close, trees grow, buildings get painted. Check the date on the imagery before you call it a mismatch.
Is this legal? A word on using it well
Everything in this guide uses public information. Journalists, rescue teams and fact-checkers use it every day.
So learning how to find where a photo was taken is not a grey area by itself.
The method is neutral. What you do with the answer is not.
Finding where a news photo was taken is fact-checking. Tracking where a private person lives is stalking, and in most countries it is a crime.
Use it on events and claims. Not on people who did not ask to be found.
Knowing how to find where a photo was taken carries the same duty as any other research skill.
How to stop your own photos leaking your location
Now turn it around. If you know how to find where a photo was taken, you know how to stop it happening to you.
- Turn off location for your camera app. This kills the GPS tag at the source.
- Strip metadata before sharing. Most phones can share “without location” from the share menu.
- Check the background. House numbers, car plates, school badges and post received in the frame.
- Wait before posting. Posting a holiday photo after you get home tells nobody where you are now.
- Watch the window. Indoor photos leak the view outside more often than people think.
Photos are only one of the trails you leave. Your browser gives away a surprising amount too, as we showed in what information does my browser share.
Small clues add up. That is exactly how investigators traced the man behind Silk Road, told in full in our Silk Road dark web story.
Questions people ask
How to find where a photo was taken, in simple words?
Check the hidden file data first. If that is empty, read the signs, the buildings, the plants and the shadows, then match the scene to a map.
Can I find the location of any photo?
No. A blank wall or a close-up face gives you nothing. You need background detail to work with.
Do photos really store GPS coordinates?
Many do, if location was turned on. But most social media sites remove that data when the photo is uploaded.
How to find where a photo was taken with no metadata?
Exactly as this guide describes. Signs, architecture, vehicles, plants and shadows, then satellite and Street View to confirm.
Is there an app that just tells me?
Some AI tools try. They guess a region reasonably often and an exact spot rarely. Always verify the answer yourself.
How long does it take?
Minutes if there is a street sign. Hours or days for a plain rural scene. Some photos are never solved.
Which clue is the most useful?
Readable text beats everything. After that, shadows, because they rule out so many wrong answers.
Is it legal to do this?
Using public maps and public photos is legal in most places. Using the result to follow or harass someone is not.
Helpful links and sources
These are the references behind this guide. You can see how we check our work on our sources and research page.
They also go far deeper into how to find where a photo was taken than one article can.
Methods and training
- Bellingcat: open-source research how-to guides
- Global Investigative Journalism Network: investigation resources
Tools
- ExifTool: read and edit photo metadata
- NOAA Solar Calculator: sun position by place, date and time
- TinEye reverse image search
- Yandex Images reverse search
Privacy guidance
More from DeepHiDX
- What information does my browser share? 10 things websites can see
- Silk Road dark web story: the 3 tools that built a secret market
- How do ransomware gangs work? 6 roles inside the ransomware business
- How to check if your email was in a data breach
- Dark web glossary
The short version
So, how to find where a photo was taken? Read the picture, then prove it on a map.
Metadata first. Then text, buildings, plants and shadows. Then satellite and Street View to confirm.
Never trust one clue. Make three of them agree.
And remember it works both ways. The same clues are sitting in the photos you post.
Once you know how to find where a photo was taken, you never look at your own camera roll the same way.



Comments